Blendtec ES3 Betriebsanweisung
Stöbern Sie online oder laden Sie Betriebsanweisung nach Mixer Blendtec ES3 herunter. Blendtec ES3 User guide Benutzerhandbuch
- Seite / 20
- Inhaltsverzeichnis
- FEHLERBEHEBUNG
- LESEZEICHEN
- Home Blender 1
- User Guide 1
- Table of Contents 3
- IMPORTANT INFORMATION 4
- SAVE THESE INSTRUCTIONS 6
- SECTION 3 - BLENDER OVERVIEW 7
- SECTION 4 - INSTALLATION 9
- SECTION 5 - CARE AND CLEANING 9
- 6.2 MANUAL CONTROLS 10
- WHY BLEND CYCLES? 12
- SECTION 7 - TROUBLESHOOTING 13
- 7.2 NOISE LEVEL CHANGES 14
- 8.1 WARRANTY DETAILS 15
- 8.2 UNDER WARRANTY 15
- 8.3 OUT OF WARRANTY 15
- 1206 South 1680 West 20
- Orem, UT 84058 20
- 801-222-0888 20
Inhaltsverzeichnis
Home Blender User Guide(International)
10 ▶If you are not using your jar daily, before each use, reach under the bottom of the jar and turn the drive shaft for a few seconds� This will help
11during a blend cycle� When the “PULSE” button is pressed the current cycle pauses and the pulse begins� When the “PULSE” button is released, the sel
12Figure 3 - Blend Cycles*Beverages CategoryDrinks/Ice Cream CategoryWhole Foods CategoryFood Processing CategoryMulti-Use CategorySmoothieIced Cappu
136.4 RESTORING FACTORY DEFAULTSThe Blendtec Home blender has the following blend cycles set as factory defaults for preset buttons numbered 1, 2, 3,
147.2 NOISE LEVEL CHANGESIf the blender noise level has increased significantly from original levels, determine whether the sound is coming from the bl
15INSTRUCTIONS THAT APPEAR IN THIS USER GUIDE ARE NOT MEANT TO COVER EVERY POSSIBLE CONDITION OR SITUATION THAT MAY OCCUR. GOOD JUDGEMENT MUST BE USE
16
19
1206 South 1680 WestOrem, UT 84058801-222-0888blendtechome�com©2011 K-TEC, Inc�, All Rights Reserved Blendtec is a registered trademark of K-TEC, Inc�
Table of ContentsSECTION 1 - IMPORTANT SAFEGUARDS �����������������������������������4SECTION 2 - UNPACKING ������������������������������������������
4SECTION 1 - IMPORTANT SAFEGUARDSIMPORTANT INFORMATIONRead all instructions carefully before using your Blendtec® blender�1.1 SAFETY CERTIFICATIONThe
51.6 NEVER PUT NON-FOOD ITEMS INTO JARMetal utensils, rocks, and glass are dangerous if placed in jar� Damage caused by such foreign objects will void
61.15 TURN THE POWER SWITCH OFF WHEN NOT IN USEThe Power Switch (ON/OFF switch) is located on the back of the blender motor cover�1.16 AVOID TOUCHING
72.2 RECORDING YOUR SERIAL NUMBER AND DATE OF PURCHASEYour serial number is located on the bottom of the motor base� Record your blender motor serial
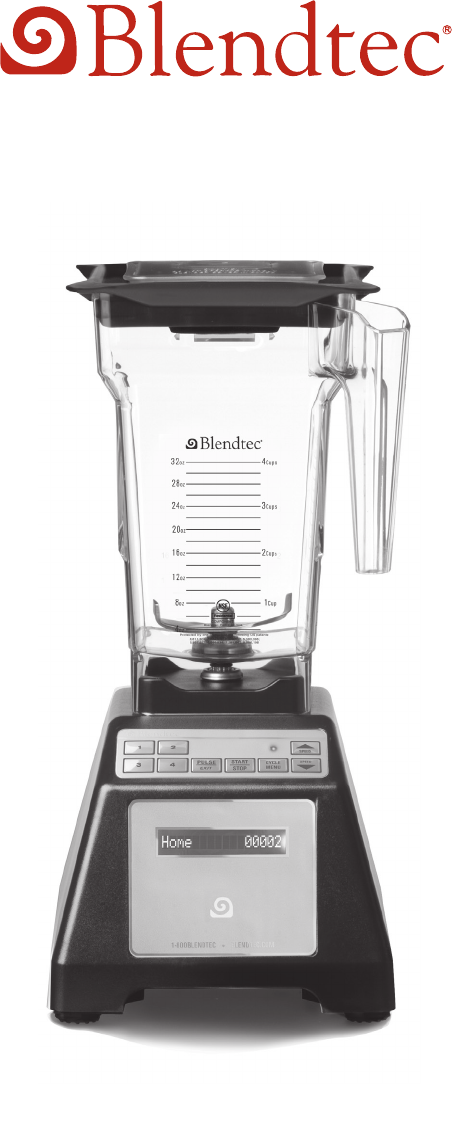
8Figure 2 Side View MOTOR BASE AND JAR ASSEMBLYFigure 1 Front ViewMOTOR BASELidJarBladeMotor Base CoverPower SwitchPower CordBlender Drive SocketTouch
9SECTION 4 - INSTALLATIONPlace blender on a flat, clean, and dry surface�Make sure a plug outlet is available within 2 feet (0�61 meters) of the blende
Verwandte Produkte und Handbücher für Mixer Blendtec ES3
 (16 Seiten)
(18 Seiten)
(23 Seiten)
(24 Seiten)
(22 Seiten)
(2 Seiten)
(24 Seiten)
(1 Seiten)
(30 Seiten)
(16 Seiten)
(18 Seiten)
(23 Seiten)
(24 Seiten)
(22 Seiten)
(2 Seiten)
(24 Seiten)
(1 Seiten)
(30 Seiten)
© 2020, manymanuals.de. Alle Rechte vorbehalten. | 1.609 s |
 Manymanuals.com
 Manymanuals.de
 Manymanuals.fr
 Manymanuals.it
 Manymanuals.pl
 Manymanuals.cz
 Manymanuals.es
 Manymanuals-pt.com
Kommentare zu diesen Handbüchern